Sunday 6 May 2012

Absent

Yes, I know. I've been very absent for the last weeks. I knew I was going to be away for a while, but I didn't want to make a "I'm going away" post, 'cus I hate those posts. Anyway... The reasons I've been away are a couple, but the most important reason is that for the last weeks my nails have looked like this:

Yes, that is A England - Princess sabra at the bottom
I've been painting and working all the time, so no time for manicures...
The reason for the condition of my nails are that there's been a big festival for my hangout place Blitz and everybody has been running around working like crazy. But the festival is over and it all went well!
Second reason is that I've been moving into a squat, and that's been very unstable. No internet and no time for blogging...
Lastly I have my exams soon and have to focus more on school now.
So yeah those are my reasons for being absent for a while, I'm hoping to be back to blogging when I'm ready! Till then, keep your own nails tiddy, since I can't keep mine!

Friday 20 April 2012

Electrical and firey nails


I created this design by using China Glaze - Fast track and China Glaze - Electrify. Both from the new Hunger Games collection. By using a makeup sponge I made a sort of gradient with the electrical glitter.


Blogger just launched a new design, of course it's terrible and I want the old one back, but I guess I'll have to get used to it! And in other news I have my exams right now, and I'm helping to arrange a big ass festival next weekend so not a lot of blogging the next days!
# What do you think of this electrical design?

Tuesday 17 April 2012

OPI - I don't give a Rotterdam

From the Holland collection, this dusty blue is very similar to Zoya - Skylar, but no dupes as Thepolishaholic states here.
The colors is toned down, but has a great golden shimmer and some pink undertones that really makes it pop! A very dusty and cold color, not great for that sunny summer feeling. It reminds me a lot of a rainy day in the city, wet asphalt and grey skies.
Three coats:

 No application problems at all.


I love the name! I've always wanted to go to Rotterdam 'cus the name is so rad!
# What do you think of I don't give a Rotterdam?

Thursday 12 April 2012

My awesome beauty's nail art challenge - My Entry

Many of you read This post about a nail art challenge I was gonna enter. The manicure I posted in that post was not the one I ended up entering with. And I totally forgot to show which one I ended up actually sending in! Here it is:

I used NicolebyOPI - Berry sweet and One time lime and A England - Dragon
And here is the first one I made.


I actually kinda like the one I didn't enter better than the one I sent it, but what the heck... The winners were amazing btw, check them out Here

# Which one did you like better?

Wednesday 11 April 2012

Deborah Lippman - Candy Shop

My first DL polish, yey! These are know to be have great quality, unique colors and be very expensive. She's been described as "one of the best manicurists in the world" by Allure, and it's not without a reason! It's a fairly new brand of nail polish, but knows exactly what nail enthusiasts want. Deborah Lippman is BIG3FREE and there is no animal testing involved!
New polishes this season is Mermaid's dream and On the beach, and there is a new range with magnet polishes coming out!
Today I'm showing you Candy Shop. A sheer bubble gum pink base packed with multi-color and size glitters!

I though I would need at least three coats since the base is so thin, but on these pictures there are only two, and I'm really happy with that! Could have used three if you want a real glitter bomb, but I'm not that into glitter so this was enough for me!

Sunlight
It went on super smooth, and the glitter did not swallow top coat so only one coat of Linda Johansen top coat was needed!


This is such a sparkly and special polish! I don't have anything like it! Even though it's not very me I love it! Here is DLs homepage, and you can buy it in Norway for approximately 169 NOK, and here's a list over places in Norway where you can buy DL

# What do you think of Candy shop?
# Do you have any Deborah Lippmans?
                                            The product(s) in this post was given to me for review

Packages!

I've gotten a bunch of great packages in the mail lately! I thought I'd show you some of the goodies I've received
First here's a picture of the stuff I won at the giveaway from Labmuffin, along with a bunch of stuff I got from Oriflame( product reviews will be up as soon as I can):

Makeupmekka had a sale on some eyeshadow brushes, a set of two for 1 kroner! I could not believe it, so I ordered three sets that arrived the other day! I've started to try them out, and they seem fine. Nothing amazing, but good enough quality:

Last, but definitely not lest, my first Deborah Lippman polish! Given to my be the great Marie. I got Candy Shop, a totally rad polish. I've already swatched it and that will most likely be up on the blog any day!


That's it! Any thing you spotted that you want a review of?

How to: Pimp your Iphone case with nail polish, Cherry Bomb

My Iphone case was just way to black and dull. It needed some work done so I chose one of my favorite designs to pimp it!
 I took step by step pictures to show how I did it:
1) I used China Glaze - Papaya punch to make the outlining. Since the orange is only going to be visible on the corners I focused the polish on those areas. Used two coats to get it opaque. The polish had a chemical reaction with the plastic on the case, you can see the crackling on the photo. I don't really mind the crackling since it's an explosion design, and most of it goes away with a top coat so no stress!

2) Filled in with OPI - Quarter of a cent cherry


3) Then filled in with some green NicolebyOPI - One time Lime.


4) Now making the Cherry. Made two dots with Orly - Cherry Bomb( I know, the name fits prefect!) and China Glaze - Holy-day and Isadora - Cool Camel 


5) Finished of with some highlights and details, and then added a top coat! Also did some cleanup with nail polish remover around the edges of the orange.


That's it! My Iphone case looks a lot cooler now, it's very me.
One can also use rhinestones, fimo or other ornaments to create a personal case. I also have my phone in my pocket so it would be very unpractical with a bunch of rhinestone and stuff on it... Even though this design will eventually go away I can just create something else! It's not gonna last forever, but that just means I can create something else!
 # Have you pimped your Iphone case yourself?

Monday 9 April 2012

OPI - Cath me in your net

A great shade from OPI! It's been lying in my untried drawer for some time now, and I have no idea why I didn't try it on before. I'm kinda out of words today, so you can just look at the pictures! They're amazing!
Two coats:


It's so mermaidy! I'm very much in love with it.


Sun

Saturday 7 April 2012

Revlon - Apple-tini Fizz

I don't know if i mentioned it, but I won the giveaway Labmuffin was hosting a while ago. It made me really happy, not only because the prize was totally rad, but because I really like labmuffins blog! If you haven't checked it out, you should. She's the beauty guide with a white lab coat and interesting facts!

So one of the polishes I won was Revlon - Apple-tini fizz, a green jelly based flakie polish, and it's scented!! Hello, gorgeous. I adore green, flakies, apple smell and jellies so this was a win-win polish for me! Since the revlon was so sheer I layered it over NicolebyOPI - One time lime. One time Lime is the polish I have that stains the very most. It's a total nightmare if you forget a basecoat with this. To be on the safe side I actually used two coats with Linda Johansen  - Ridge filler.
One coat One time lime and two coats Apple-tini Fizz


 Apple-tini fizz was very sheer, and it kinda flooded my cuticles when I first tried to put it on. So for this polish very thin coats is the thing! The scent is great! Kinda like sour apple-candy, fits perfect with the name. I think the best way to describe the scent is just by saying Apple-tini Fizz, hehe.

I think this would look great layered over black, need to try that next time! Or maybe I'll go a little crazy and layer it over red or purple, what do you say?

# What do you think of Apple-tini fizz?
# Did you have a nice Easter?

Friday 6 April 2012

Easter Splatter

Splatter nails are always fun, so today I made one with some Easter appropriate colors.
The base is Ulta3 - Lollypop Lilac with splattered OPI - Planks a lot, HM-Spoiled beauty and HM-I'm not a kiwi. I also applied a coat of Essence - Soft touch top coat to get a satin finish:


Happy with this!
# What do you think of this splatter?

Thursday 5 April 2012

Guide to get rid of ridges and yellow nails!

Ridges, staining and yellow nails are things that most of us experience. It's not pretty, and no one wants it. So here's my little guide on how to deal with such problems!
On this photo my nails are full of ridges, very yellow and the ring finger is very stained from a red polish:


If you have both ridges and staining the best way to get rid of this is by using a buffer. The buffer will buff away the ridges with of it's rough surface and at the same time remove a lot of discoloring. Most buffers have two or three sides, on rough and one smooth to make the nail shine. My buffers are from Oriflame and consists of three parts. Clean, condition and shine.

The cleaning part is the most important, and I'm actually kinda skeptical to the condition and shine part. It doesn't really do a lot, only make the nail shine and remove the remains from the buffing. So I don't use the other parts that much, but that's optional. Be careful not to buff to much, it will weaken your nail and make it more vulnerable to breakage
After buffing:

After using the condition and shine files:

So the buffer will remove a lot, and is by far my best tip for getting rid of ridges and some discoloring. You can see from the photo that all the ridges have gone, and most of the staining!

Yellow nails

If you have really yellow and stained nails, but no ridges you can still use a buffer, but it will not be as effective and will mostly only weaken the nail plate. For dealing with this problems I have two main tips to share:
1) Toothpaste
Most toothpastes contain bleaching of some kind and all of them contain very small particles to scrub the surface of the tooth. So pick a toothpaste, preferably one that promises you "white teeth in a month" or something, 'cus that will contain bleach. Place a small amount on a nail scrub, and scrub away!


I like to scrub hard for about five minutes, depending on how yellow your nails are.

Option 2) 
Take a small amount of toothpaste and rub some on each nail.

Leave on for 10 - 15 minutes and then massage the paste into each nail and rinse of.

Tip 2) Lemons
Lemons are natural bleachers and people use them for everything from cleaning their house to bleach skin and hair. So obviously it will help to bleach your nails! Cut a lemon in half, stick your finger tips into it and stay like that for 15 minutes. This is great to do when you're watching a movie or something. After the 15 minutes have gone, wash your hands and use a good handcream 'cus lemons will really dry out your hands and cuticles!

Option 2) Lemons and baking soda
Along with lemons, baking soda has also been used to clean around the house a lot. Somehow it removes  stains really well if you let it sit for a while, so why not use it on our nails? Make a paste with the juice of half a lemon and one teaspoon of baking soda.  This mix will create a chemical reaction and swell, but just wait until it has "calmed down"

Then smear some of the paste onto each nail, let it sit for 10 - 15 minutes, depend on how yellow your nails are, then massage it into the nail. Rinse of with warm water and use a good handcream.

Yellow nails come from a lot things including color pigments in the polish, lack of oxygen and may also be a sign of diabetes (contact a doctor if you suspect this!) Ridges can come from lack of vitamins, and some claim that it's a sign of bad digestion. Anyway, their both signs of there being something wrong with your body, so you should be aware if you're having major problems with ridges or discoloring.

So those were my tips for getting rid of ridges and dealing with yellow and stained nails! I also like to use a ridge filler or nail strengthener afterwards. As you can see from this photo, my nails look a lot better!

I hope these tips were helpful! And if there is anything else your wondering don't hesitate to ask!

Wednesday 4 April 2012

Week 14 - Striped mani

I know I did week 13 only a couple of days ago, but I have some catching up to do, so two weeks in one this time!
For the striped mani I wanted to do something reminding of candy canes, I made this design for Christmas so I kinda remade it only in different colors:

Sinful colors - Aquamarine and Gina Tricot - Grape wine. I didn't get the lines as straight as I wanted to, so it looks kinda screwed up... But what the heck.


Ah, I'm so glad it's Easter and I have time of from school. I'm trying to use the time of to read for my exams, but it's so tempting to make nail art instead! A little bit of both is a good combo I guess!

Monday 2 April 2012

Blue butterfly wings

I friend of mine said that her favorite naildesign by me was my butterfly nails that I made a while ago. You can see that post here. Since I've only made those ones, and that time in a bunch of different colors, I felt like it was time to make some new butterfly wings! This time in blue:
To make this I took OPI - What's with the cattitude as a base and then sponged on some HM - Blue my mind, then painted the black lines and added some white dots. Very simple actually, but it looks very fancy!

Butterflies are definitely one of my favorite animals, so colorful and precious!

I also want to say that I've made a facebookpage for my blog! Check it out here! I'd love if you guys would like to follow me there, I guess it's a lot easier for those of you who don't have GFC. I'm having problems connecting the page to my blog though, with the html and a that stuff (not my area at all!) so if any of you know how to make a sidebar for the fb on the blog I will totally adore you! Here is the link I've tried to use to create the sidebar
# Do you like my butterfly wings?
# Are you gonna follow me on facebook?

Week 13 - Ruffian Mani

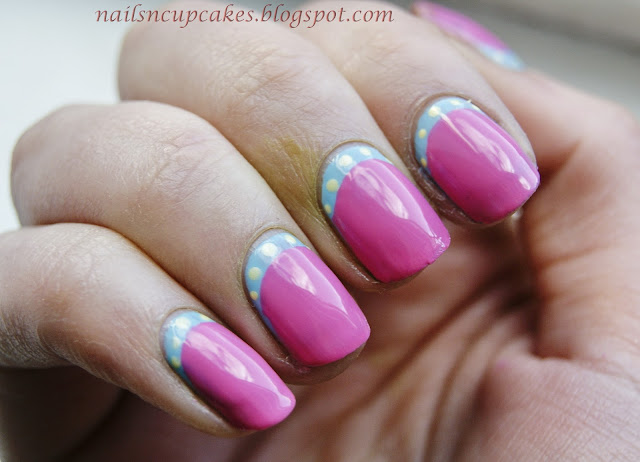
I know, I'm a week behind now, but since I have vacation I'll be able to catch up on the One year challenge this week! Today I have a really cool design that's well known in the nail-world, but I've never made before. A ruffian mani! This is sort of the opposite of a french tip, with the U shape at the bottom at the nail instead of the tip. I wanted to make this in colors that went well with the fact that it's Easter now! I chose OPI - What's with the cattitude, HM - Spoiled beauty and then some dots with Isadora - Mellom yellow.


There are a bunch of ways to make this design, so I made a little step by step on how I did mine. You can use stickers like a french tip sticker or round stickers:

As you know I'm not a big fan of tape manis, or using stickers as a template, so I decided to do it freehand. Here's a little tutorial on how I did it:
I painted the lower part of my nails with two coats of What's with the cattitude, you can do the whole nail if you feel like it...

With a thin paint brush I drew a half circle, starting at the middle of the nail were the ruffian will be thickest

Then I filled in with Spoiled beauty using the nail polish brush. Be very careful when your getting close to the edge of the circle not to cross it with the polish brush. Use the thin brush to fill in if your having problems

Then I added the dots using the smallest end of a dotting tool, starting at the middle of the ruffian, clean up around the edges and top coat! Finished!


The down side to doing the ruffian free-hand is that you don't get that super sharp edge the sticker gives. But you can decide the thickness, shape and how much you want the ruffian to curve for yourself so I prefer it this way!

# What do you think of my ruffian?
# Are you doing anything fun for Easter?